I’ve spent years testing controller settings hssgamestick configurations to find what actually works.
You’re probably here because your default settings feel off. Your aim isn’t connecting and your reactions feel sluggish. That’s not you. That’s the settings.
Here’s the thing: factory defaults are built for everyone, which means they’re perfect for no one.
I tested every firmware update and worked with competitive players to figure out which settings make a real difference. Not the ones that sound good. The ones that change how you play.
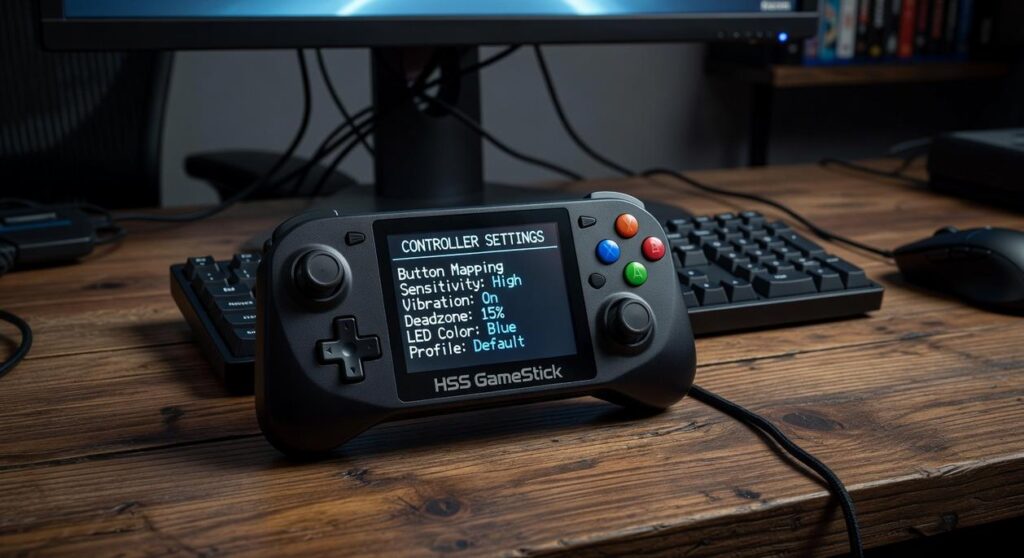
This guide walks you through every customization option on your HSS Gamestick controller. I’ll show you how to access the settings menu, adjust sensitivity and button mapping, and fine-tune the options most players never touch.
You’ll get step-by-step instructions that actually work. No guessing which setting does what or why your controller still feels wrong after you change something.
By the end, you’ll have a controller that responds the way you need it to. Not how some engineer thought it should respond.
Let’s get your settings dialed in.
Accessing the Controller Settings Menu
Look, I know menus can be confusing.
Especially when you just want to tweak your controller and start playing. Every console seems to hide these settings in a different spot.
The good news? Once you know where to look on your HSS Gamestick, it takes about 30 seconds.
Some people say you shouldn’t mess with controller settings hssgamestick at all. They think the default setup works fine for everyone. Just plug in and play, right?
But here’s what that ignores. Your hands aren’t the same as mine. Your playstyle is different. What feels natural to one person feels awkward to another.
So let me walk you through this.
Step 1: Power on your console and make sure your controller is synced. You’ll know it’s connected when the player light stops blinking.
Step 2: From the main Home Screen, find the System Settings icon. It looks like a gear (because apparently every tech company agreed that gears mean settings).
Step 3: Once you’re in System Settings, scroll down until you see Controllers & Peripherals. Select that option.
Step 4: Now choose Adjust Controller Settings. This is your main customization menu.
That’s it. You’re in.
Everything else I cover in this guide starts from this screen. So if you ever get lost, just come back here and follow these four steps again.
Core Adjustments: Tailoring the Basics for Peak Performance
This is where you’ll make the most impactful changes to your gameplay experience.
Calibrating Analog Stick Sensitivity
You know that feeling when your aim is just slightly off? When you overshoot targets in shooters or can’t quite nail tight corners in racing games?
That’s usually your stick sensitivity.
This setting controls how much in-game movement happens when you push the analog sticks. It’s the difference between smooth precision and constant frustration.
Here’s how to fix it.
Select Stick Sensitivity from the menu. You’ll see separate sliders for the Left and Right sticks.
The key thing most people miss? You can adjust horizontal and vertical sensitivity independently. A lower number means you need more physical stick movement for the same in-game action. Higher numbers make everything faster and more responsive.
For FPS games, I recommend starting around 4/10. It feels slow at first but your accuracy will jump. Once you’re comfortable, bump it up gradually.
(Trust me on this. I’ve watched too many players crank sensitivity to max and wonder why they can’t hit anything.)
Customizing Button Layouts (Button Mapping)
Button mapping lets you reassign what each button does.
Some people say you should just learn the default layout and stick with it. That muscle memory matters more than comfort.
But here’s what they’re missing. If you came from Xbox and the HSS Gamestick’s confirm button feels backwards? You’re going to make mistakes. Constantly. And in competitive games, those mistakes cost you.
Select Button Mapping from the menu. Choose your controller and you’ll see a visual layout of every button.
Click the button you want to change. Then pick its new function from the list.
Want Jump on a bumper so you can aim while jumping? Done. Need Reload somewhere easier to reach? Simple fix.
The real power move? Save your layouts.
The HSS Gamestick lets you store three custom profiles. I keep one for shooters, one for fighting games, and one for everything else. When I switch games, I just load the right profile instead of remapping everything.
Just hit Save Profile and give it a name you’ll remember.
You can check the latest hssgamestick updates by hearthstats to see if new mapping options have been added.
Pro Tip: Before you start tweaking controller settings hssgamestick options, write down the default layout. If your custom setup feels wrong after a few sessions, you’ll want an easy way back.
Advanced Tuning: Deadzones and Haptic Feedback
Fine-tune your controller to eliminate physical imperfections and customize your tactile experience.
Adjusting Stick Deadzones
A deadzone is a small area around the analog stick’s center where movement doesn’t register.
Think of it like a buffer zone. When your stick sits at rest, tiny movements within this zone get ignored.
Why does this matter? If you’ve ever noticed your character drifting to one side when you’re not touching the stick, that’s stick drift. It happens when wear and tear throws off the stick’s neutral position.
Increasing the deadzone fixes this. You’re basically telling the controller hssgamestick to ignore those phantom inputs.
But here’s the tradeoff. A smaller deadzone makes your stick feel snappier and more responsive. A larger one can make it feel sluggish (like there’s a delay before your inputs register).
Here’s how to dial it in:
Go to the Controllers & Peripherals menu and find Deadzone Calibration. You’ll see an on-screen test that shows your current drift in real time.
Increase the deadzone setting just enough to stop the unwanted movement. Test it. If your stick still feels responsive, you’re good. If it feels mushy, dial it back a notch.
Controlling Vibration & Haptic Feedback Intensity
Haptic feedback adds immersion when you’re playing. You feel every explosion and every hit.
But high intensity can be distracting. And it definitely drains your battery faster.
The HSS Gamestick lets you control how strong that rumble actually is.
Here’s the setup:
Select Vibration Settings. You’ll see a slider that goes from 0% (completely off) to 100% (full power).
Use the Test Vibration button to feel what each level is like. I usually keep mine around 60% because I want the feedback without my hands going numb during long sessions.
What’s next? Once you’ve got your controller settings hssgamestick dialed in, you might be wondering how these tweaks affect different game genres. Racing games benefit from higher haptic feedback, while competitive shooters often work better with it turned way down or off entirely. Test your settings in the games you play most and adjust from there.
Troubleshooting Common Controller Setting Issues
Look, we’ve all been there.
You spend 20 minutes tweaking your controller settings to absolute perfection. Everything feels dialed in. You’re ready to dominate.
Then you boot up the next day and… nothing saved.
My settings aren’t saving
First things first. Did you actually hit ‘Save Profile’ or ‘Apply Changes’ before you bounced? (I’ve done this more times than I’ll admit in public.)
If you’re positive you saved and your settings still vanished into the void, try a system software update through the ‘System Settings’ menu. Sometimes your console just needs a little refresh.
The controller feels unresponsive after changes
So you adjusted your deadzone and sensitivity settings and now your character moves like they’re stuck in molasses. Or they’re twitching around like they’ve had six energy drinks.
Here’s what probably happened. You went too far in one direction.
The fix? Hit that ‘Reset to Default’ option in your controller settings hssgamestick menu and start over. But this time, make smaller changes. Like, way smaller.
Think baby steps instead of giant leaps.
Your future self will thank you when you’re not rage-quitting because your aim feels like you’re controlling it with oven mitts.
Your Controller, Your Rules
You now have a complete understanding of how to adjust your controller settings hssgamestick to perfectly match your playstyle.
By moving beyond the default configuration, you’ve addressed the core problem of a one-size-fits-all setup.
The solution works because it puts the power of customization in your hands. You get more precise control, better comfort, and gameplay that actually feels right.
Here’s what you should do next: Apply these settings and jump into your favorite game. Test them in a real match and make small tweaks as you go.
The difference a perfectly tuned controller makes is immediate. You’ll feel it in your first session.
Your setup should work for you, not against you. Now you have the tools to make that happen.